Automating Hugo site generation and deployment
In a previous post, I wrote about moving from Pelican to Hugo for static site generation (this site). In today’s update, we’ll learn how to fully automate the generation of the static site and publish to an S3 bucket (or S3 backed CloudFront distribution).
I self-host a lot of engineering services, so in this example, I’ll be using Gitea for source control and Drone for CICD. If you are using public services, you may want to look at Git, Travis CI, or Circle CI
Assuming that you already have Gitea and Drone talking to each other, the first step is to activate your repository in drone. This tells drone to start watching that repository in order to trigger action. Navigate to your drone instance and click activate on the repository housing your Hugo site.

Now that drone is connected to your repository, its time to tell drone what to do. We do this by adding a .drone.yml file at the root of our repository. This file will house the instructions that pur drone into action. Here is an example .drone.yml file.
---
kind: pipeline
name: default

steps:
- name: build
  image: plugins/hugo
  settings:
    hugo_version: 0.74.3
    validate: true
    url: https://tjgreco.com

- name: upload
  image: plugins/s3
  settings:
    source: public/*
    bucket: [bucket name here]
    acl: public-read
    access_key:
      from_secret: aws_access_key_id
    secret_key:
      from_secret: aws_secret_access_key
    source: public/**/*
    target: /
    strip_prefix: public/

- name: slack
  image: plugins/slack
  settings:
    username: drone
    webhook:
      from_secret: slack_webhook
    channel: builds
    template: >
      {{#if build.pull }}
        *{{#success build.status}}✔{{ else }}✘{{/success}} {{ uppercasefirst build.status }}*: <[internal git url here]{{ repo.owner }}/{{ repo.name }}/pull/{{ build.pull }}|Pull Request #{{ build.pull }}>
      {{else}}
        *{{#success build.status}}✔{{ else }}✘{{/success}} {{ uppercasefirst build.status }}: Build #{{ build.number }}* (type: `{{ build.event }}`)
      {{/if}}
      Commit: <internal git url here{{ repo.owner }}/{{ repo.name }}/commit/{{ build.commit }}|{{ truncate build.commit 8 }}>
      Branch: <internal git url here{{ repo.owner }}/{{ repo.name }}/commits/{{ build.branch }}|{{ build.branch }}>
      Author: {{ build.author }}
      <{{ build.link }}|Visit build page ↗>

trigger:
  branch:
  - master
  event:
    include:
    - push
As you can see, my drone pipeline has 3 major steps.
- Build (actually builds the hugo site)
- Upload (uploads the site to Amazon S3)
- Slack (slack notify me of build success and failures)
While this is simple enough, there are a few “gotchas” to keep in mind.
Build Step:
Tip
In the build step, it is important to set your url to your final production url. This will ensure that any links are appropriately rewritten for the new environment
Upload Step:
Tip
The upload step needs to be able to write to your S3 location using your AWS keys. Naturally, you don’t want to check these credentials into git/gitea, so we make use of Drone’s Secrets capabilities. In the drone file, we reference variables using from_secret, and then use the drone command line tool to store the secret under the variable name. Example:
drone secret add --repository tgrecojr/tjgreco.com --name aws_secret_access_key --data secretvaluehere
Normally in upload, this step will preface all filess with the public/ directory. Since I’ll be hosting this blog at the root of the site, I use strip_prefix: public/ to remove the subdirectory (essentially copying files with the equivalent of a ..)
Slack Step:
Tip
Just as in the upload step, you’ll want to store your slack webhook url using Drone Secrets.
Triggers:
Without further configuration, Drone will spring into action for every branch and action in git/gitea. For my workflow, I only want to publish when I have merged my code into master via pull request. In order to limit this activity, the following configuration is used. You can read up on drone triggers to customize for your needs
trigger:
  branch:
  - master
  event:
    include:
    - push
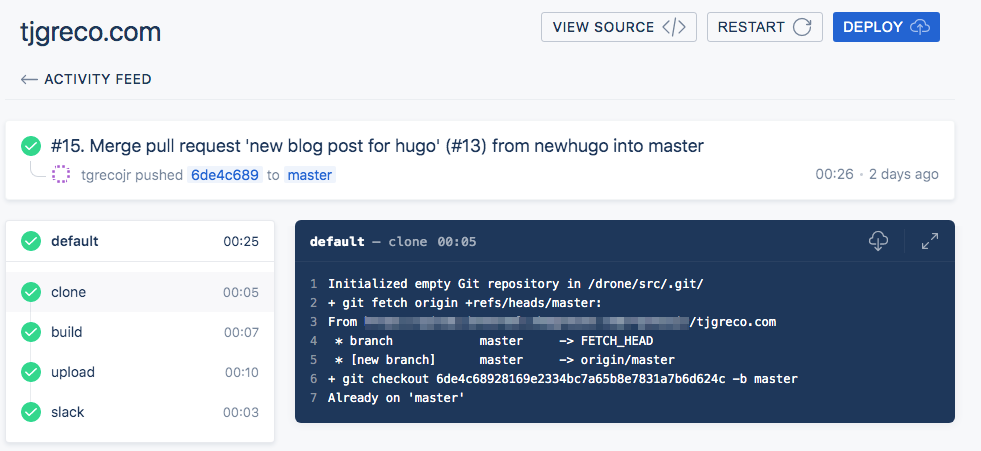
After a PR, you should be able to log back into Drone and see your success!
That’s it! Happy deploying! In my next post, I’ll be addressing the incompatibility of staticly generated Hugo sites with AWS Cloudfront distributions, and how to address the issue using Lambda@Edge functions. Hint: It’s about index.html